Adventures in minimalism with Arch Linux
By Mark Dixon
Intro
How small can you go? Adventures in finding a minimal Linux for VMs.
A hundred years ago or more, back when Linux was still largely the undiscovered wild west, you would to install Linux by hand from a handful of 1.44mb floppies painstakingly copied from a friend: kernel, bootloader, gcc, gdb, Emacs, Ghost-script, the lot.
A decade later there came a period of minimalist distros such as Tiny Core Linux - aimed at getting X up on your screen in as few bytes as possible. Sadly(?) the need for such distros seems to have waned; Tiny hasn’t received an update since 2008.
I recently needed to spin up a tiny server VM to test something (some SQL injection, don’t ask). On my Mac, UTM seemed like the smoothest option with it’s gallery of pre-built VM images: a 500+MB installer download followed by a short install process leaving me with a 2GB virtual disk image. Hardly tiny, nor core - what if I want to share my VMs? Storage is cheap, but bandwidth still costs. Thus was born my brief obsession with the thought: how small can you go for a shareable Linux VM?
TLDR: don’t go with Arch or any mainstream distro. As shall be seen later, there are still a few distros around aimed at true minimalism. I can get Arch down to a circa 850MB file - but e.g. Alpine Linux weighs in at a fraction of that (50MB).
Installing QEMU
So shareable would mean least common denominator: targeting x64 architecture. This doesn’t leave many options for virtualisation - as a Mac user, we’re talking full system emulation or nothing: QEMU. UTM is really just a wrapper around QEMU - so for the sake of transparency and better control, lets stick to QEMU.:
MacOS
QEMU is easily installed with Homebrew (follow that link first if you don’t have it installed).
brew install qemu Grab a ☕.
Not MacOS
Your mileage may vary - but QEMU shouldn’t be that hard to get your hands on.
Ubuntu
sudo apt-get install qemu qemu-utilsBootstrapping QEMU
Step 1: virtual disk image
To keep things as small as possible outside the VM, we need a sparse image disk. QEMU has a built-in tool for creating and converting disk images:
qemu-img create -f qcow2 vdisk1 100G100GB is a bit bigger than we need - but since it is a sparse image, the file should never get that big.
qcow2 is QEMUs own file format for disk images with support for sparse imaging: aligning nicely with our goal.
Now you should have a single file vdisk1 that is roughly 200KB.
Step 2: download the Arch ISO installer
If we want to get small, we probably don’t want to use an off-the-shelf Arch VM image: we want to do this hardcore mode and that means starting with an ISO image. Find your convenient mirror from the list at https://archlinux.org/download/ and download with:
curl --fail --remote-name --location --continue-at - \
   https://ftp.acc.umu.se/mirror/archlinux/iso/2023.04.01/archlinux-2023.04.01-x86_64.iso
Going Arch
Now we can run QEMU with our newly created sparse disk image and the ISO image we downloaded.
Booting the installer ISO
Note: taking the lazy approach to networking (-netdev vmnet-shared) means having to run QEMU as root, allowing QEMU to automatically set up bridging for you.
sudo qemu-system-x86_64  -m 2048 \
     -hda ./vdisk1 -cdrom ./archlinux-2023.04.01-x86_64.iso  \
     -device virtio-net-pci,netdev=net0 \
     -netdev vmnet-shared,id=net0 \
     -name ArchLinux -device virtio-rng-pci -boot menu=on
If you don’t feel comfortable running your VM as root (on MacOS) then it looks like you might be out of luck for now: the Arch installer will want a network connection.
After a couple of minutes you should have a root prompt:
Preparing for installation
First a few small details to make the rest smoother.
Enable the correct keymap for your keyboard. The official Arch installation instructions recommend looking at all the available keymaps with:
ls /usr/share/kbd/keymaps/**/*.map.gzIf you are running MacOS then you can go straight to the relevant Mac files:
ls /usr/share/kbd/keymaps/mac/allOn my Swedish Macbook Pro this gives me apple-a1243-sv as my desired keymap.
Install with:
loadkeys apple-a1243-svNext, check you have a working network interface:
ip linkshould reveal an ethernet device, probably with the device name ens3

If you see the green “UP” status then you should have a working internet connection. The final test is to verify that DNS is working and that you can ping out:
ping archlinux.orgPartitioning the disk
For anyone who did install Slackware from floppies, it should be somewhat reassuring to know that things really haven’t changed much in 30 years.
Your virtual disk should be available at /dev/sda and fdisk will let you set up your partitions ready for an install.
Double check the disk is there with:
fdisk -1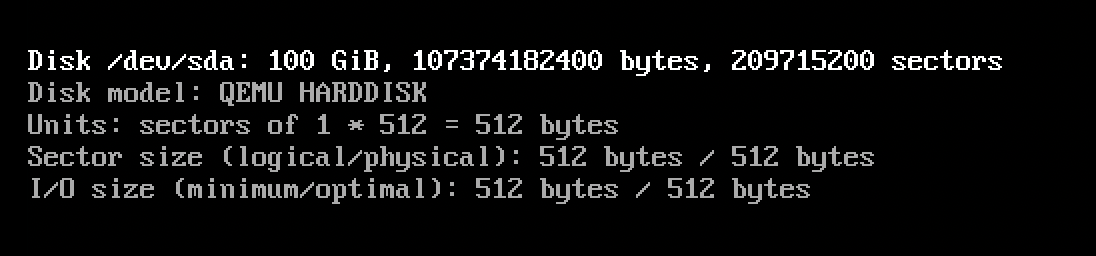
The standard Arch installation documentation will now recommend using fdisk to partition your disk. However, since we are targeting a simple and minimal virtual machine image, lets skip that and go straight to what works: gdisk.
We are going to create three partitions: a GPT boot partition, a minimal swap partition (this really should be optional, but will depend largely on how much memory you are prepared to allocate to your VM), and the remaining space for the file-system.
BIOS boot partition
This will prepare the disk for a GPT boot process (and a safe MBR). From the Arch wiki: MBR (master boot record) dates back to the DOS era and has a number of limitations. GPT is the more modern and more flexible boot loader. Unless you are using a legacy bios and want to dual-boot with Windows then GPT should suffice. For our VM we’ll go BIOS/GPT which means we need to reserve 1MB at the start of our disk for grub.
gdisk /dev/sda
o
y
n
1
2048
+1M
ef02
Swap
Still in gdisk we now create the swap partition (type 8200):
n
2
4096
+512M
8200
Filesystem
And the filesystem (type 8300):
n
3
1052672
209713151
8300
Confirm and write
Now time to make sure things look right before writing to the partition table, use gdisk’s print command p:
pwhich should show your three partition tables with correct types:
Number  Start (sector)    End (sector)  Size       Code   Name
  1              2048           4095   1024.0 KiB  EF02   BIOS boot partition
  2              4096        1052671   512.0 MiB   8200   Linux swap
  3           1052672      209713151   99.5 GiB    8300   Linux filesystem
And finally write to disk and exit:
w
y
Initialising the disk
Now we should have two partitions available as /dev/sda1 and /dev/sda2 - if for some reason they haven’t turned up, the simplest solution is to reboot your VM:
rebootFormatting
Now it is time to format the partitions:
mkswap /dev/sda2
mkfs.ext4 /dev/sda3
Mount
And mount them ready for installation:
mount /dev/sda3 /mnt
swapon /dev/sda2
Install Arch
Three short commands prep for the installation process: essentially bootstrapping the package manager onto our newly mounted partitio (/mnt), generating the fstab file for the partitions and finally chroot-ing onto the new filesystem for installing.
pacstrap -K /mnt base linux #linux-firmware
genfstab -U /mnt >> /mnt/etc/fstab
arch-chroot /mnt
Running pacstrap should take a few minutes, so another ☕.
Networking
We skipped installing ~linux-firmware with pacstrap above in order to keep with a minimalist install. However, this means that certain key packages for networking will be missing. Install those manually:
pacman -S dhcpEditor
Install your favourite editor such as vi or nano
pacman -S nanoTimezone
ln -sf /usr/share/zoneinfo/Europe/Stockholm /etc/localtimeWhere Europe and Stockholm can be swapped out with your own region and city.
Localization
locale-genCreate a file called /etc/locale.conf using your favourite editor with:
LANG=en_US.UTF-8And another file /etc/vconsole.conf with your keyboard keymap from way up above:
KEYMAP=apple-a1243-svNetworking
Create the file /etc/hostname to define your new VMs network name:
mycoolvmAnd since we are networked up, lets make sure we have a password on root:
passwdBoot loader
This step is crucial - or we won’t be able to boot into our shiny new kernel. In keeping with the minimalist aim, lets go GRUB on GPT:
pacman -S grub
grub-install /dev/sda
grub-mkconfig -o /boot/grub/grub.cfg
Reboot!
Now it is time to leave the chroot and reboot the system into your new Arch installation:
exit
shutdown -r now
Remember to press escape at the first boot menu in order to pick the virtual harddisk image to boot from.
Final Arch setup
Now that we have booted into our VM image, there are a few last steps to getting a usable (but minimal) environment.
Networking
Check that your network interface was found, it is most likely named ens3:
ip linkCreate the wired network config file /etc/systemd/network/20-wired.network with your favourite editor with the following content:
[Match]
Name=ens3

[Network]
DHCP=yes
And now activate networking and DNS resolution:
rm /etc/resolv.conf
ln -rsf /run/systemd/resolve/stub-resolv.conf /etc/resolv.conf
systemctl enable systemd-networkd.service
systemctl start systemd-networkd.service
systemctl enable systemd-resolved.service
systemctl start systemd-resolved.service
At this point you should have working networking which you can test with ping:
ping archlinux.orgCleanup
Our goal was a minimal install - so now it is time to see how well we did:
df -Hwhich should reveal that we landed in circa 1.4G used space:
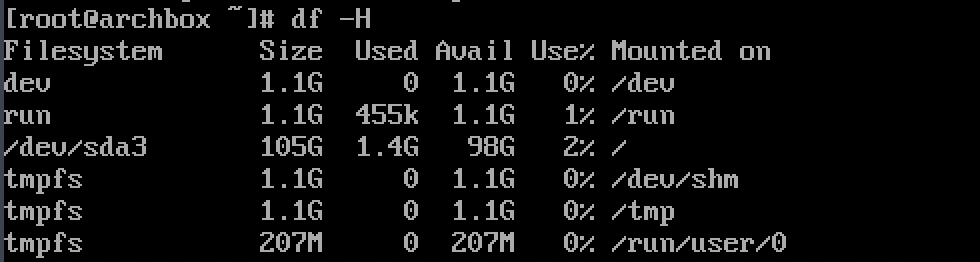
So not exactly minimal - which raises the question, what can we trim?
There is a useful utility called ncdu that will help us explore the filesystem and see what is taking up space.
pacman -S ncdu
cd /
ncdu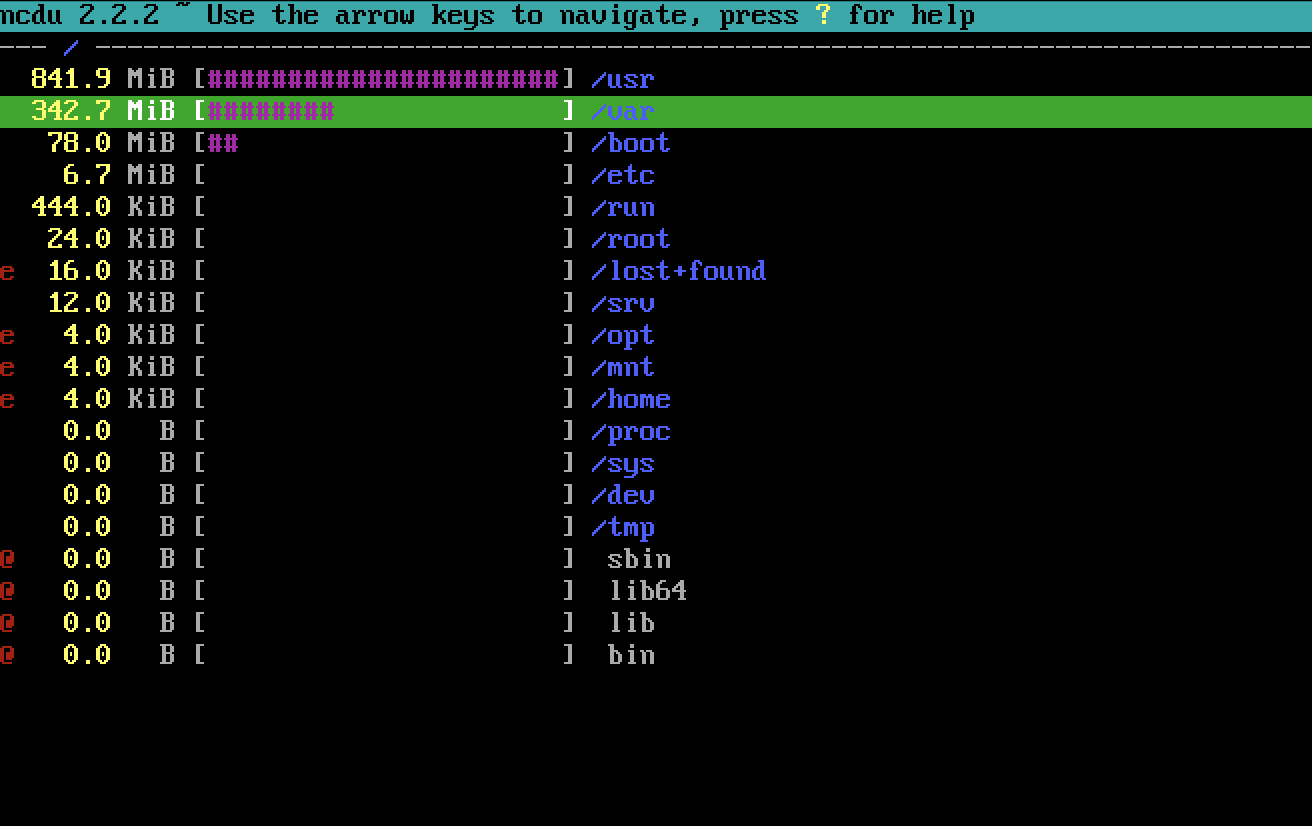
So mostly files in /usr and /var.
Cleaning /var
Digging deeper into /var shows that all the space is the cache for package management. We can safely wipe most of this - exit ncdu and run:
rm /var/cache/pacman/pkg/*And now re-run ncdu:
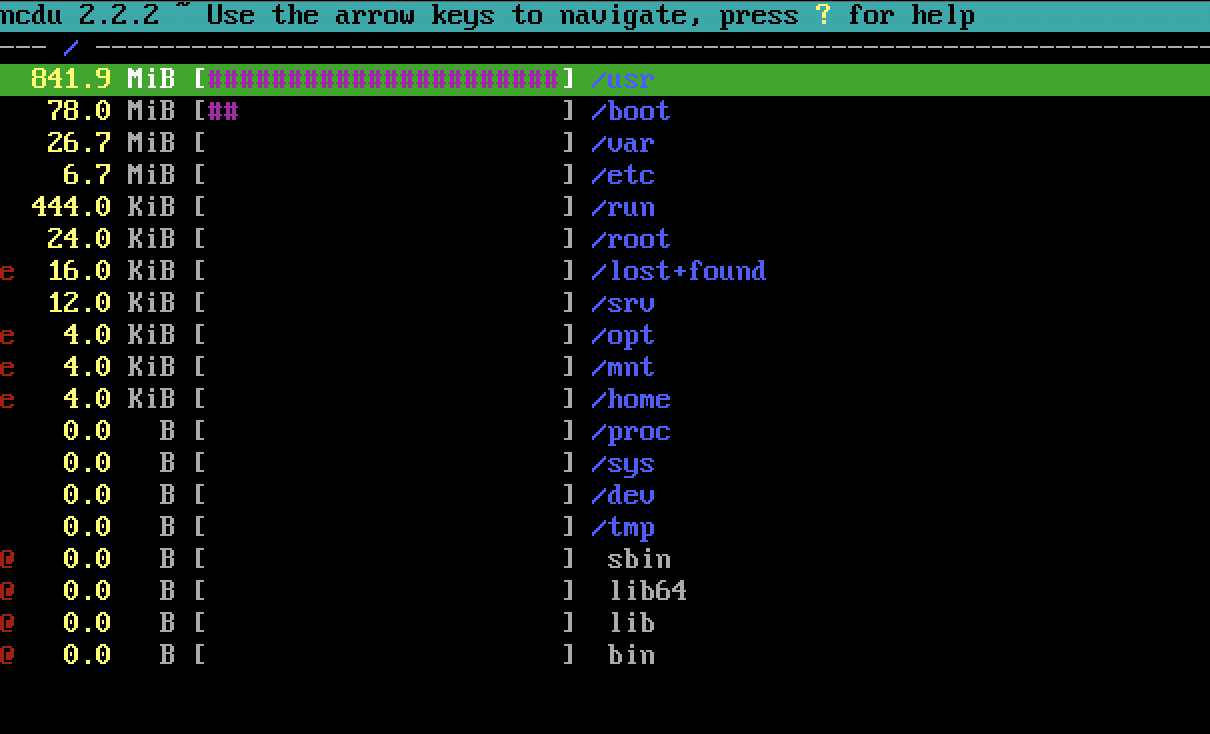
Cleaning /usr
So far so good, that just leaves two offenders: /usr/lib and /usr/share. The latter is mostly locale data. Using ncdu navigate down to /usr/share/locale and remove any locale folder you aren’t using (in my case only en_GB and en_US is needed) - pressing d on any folder will prompt you to delete it.
Finally digging into /usr/lib shows that the final large offender is all the kernel modules for drivers: networking and media. Since our VM is only using the Intel e1000 driver we should be able to safely remove the other drivers (especially the wireless ones).
Just be careful not to delete the drivers you need - here I could do some more experimentation, I’m guessing 99% of the kernel modules can go.
Small fry
Again, more experimentation could be done here to get the build down even further: e.g. /usr/share/man is consuming 25MB - how often do you run man?
Checking the final result with:
df -Hnow shows:
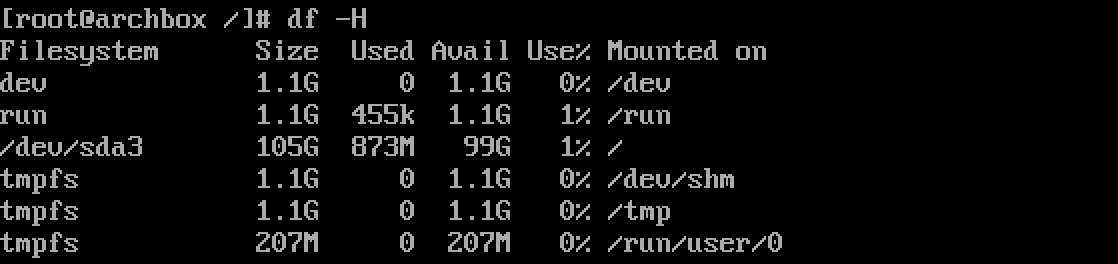
which means we are now landing under 1GB. For a clean Arch install this is probably about as good as we can get without chasing thousands of small files. But depending on how small you want to get you could spend more time here.
Final cleanup
Reboot to make sure your system is still (net)working!
The final task we can do is to get our sparse image as small as possible. But for that to work we need to zero out the free disk space (since sparse imaging is based on optimising for unused sectors).
cat /dev/zero /tmp/zeros
dd if=/dev/zero of=/tmp/zeros
rm /tmp/zeros
sync
poweroff
Once we exit our VM and check the size of vdisk1 you’ll probably see that it is a bit bigger than 873MB - so we can do a final compression back to a minimalist sparse image using qemu-conv:
qemu-img convert -O qcow2 vdisk1 vdisk1.minimal
gzip vdisk1.minimal
du -sm *
Now we should have a compressed sparse image landing in at circa 850MB - not great, but not bad either. This size VM could be shared without too much hassle.
Conclusion
So 850MB compressed images can theoretically be distributed using github releases - but if the goal is truely minimalist then we can do much better with another distro. For example Alpine linux, or even programmatically with Buildroot: topics for future notes.
One idea for minimalist / shareable VMs was to create a series of VMs for training ethical hacking techniques. So why not take the Arch image above and install nginx, php and postgresql and make a fake website with SQL injection vulnerabilities to play around with: https://yonkov.github.io/post/how-to-make-a-website-from-scratch-using-php-and-mysql/
Thanks for liking and commenting!